Ir al contenido principal

Managing Conditional Formatting in Sage Enterprise Management (Sage X3)


Managing Conditional Formatting in Sage Enterprise Management (Sage X3)
Often, when our prospects are evaluating Sage Enterprise Management (Sage X3) and trying to differentiate it from other competing products, they’re very impressed with the level of personalization and flexibility that comes inherent with the product.

You can think of conditional formatting as automatic formatting that’s triggered by conditions you define. For example, you can use conditional formatting to automatically change the color of cells that contain values greater than or less than certain values. Conditional formatting is a great way to visually highlight important information and, as part of our demonstrations, we’re frequently asked to show how Sage Enterprise Management can color code certain fields based on a set of business rules.

Request a Sage Enterprise Management (Sage X3) Demo »


While prospects are typically impressed at Enterprise Management’s ability to do this, we find that they rarely take advantage of it once the system is implemented. The intention of this blog is to remind our clients and tell prospects how simple this feature really is, and hope that it can be quite useful for many users.

Here’s an example scenario – what if you could know, at a glance, that you’re short on an item or that you fell under the acceptable margin for the calculated net price? Using conditional formatting, a visual queue can easily and quickly show you when something isn’t right, allowing you to manage the exception and make your operation run more smoothly.


Here's how to use conditional formatting in Sage Enterprise Management:

Identify field that needs to be formatted.

conditional formatting in Sage Enterprise Management (Sage X3)


Create conditional style code.


conditional formatting in Sage Enterprise Management (Sage X3)


Associate code with the field.


conditional formatting in Sage Enterprise Management (Sage X3)


A transaction will generate if entry transactions are involved.
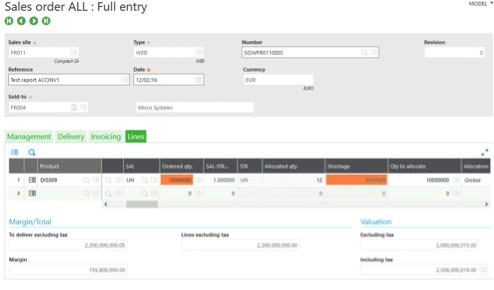
After creating or modifying a Sales Order, the fields get highlighted.


conditional formatting in Sage Enterprise Management (Sage X3)

In summary, the conditional formatting feature is a great way to visualize data and make information “pop” for the end-user, allowing for quick decision-making. If you’re working in a grid with many line items (such as a large sales order imported from your e-commerce site), it would be extremely difficult to see patterns and trends of the raw data without conditional formatting.

Entradas populares de este blog

Valores de fstat

Fstat fstat  is a numeric status that is returned upon execution of a database operation, a sequential file operation, or a lock instruction. Syntax fstat Examples # MYTABLE is a table with a key called KEY1, that has a unique component called KEYVAL # Create a record in the table MYTABLE with they key value 1 if it doesn't exist Local File MYTABLE [MYT] Read [MYT]KEY1=1 If fstat [MYT]KEYVAL=1 : Write [MYT] If fstat MSG="The key was created in the mean time" Else MSG="Key created" Endif Else MSG="Key already exists" Endif Details fstat  is always set to '0' if the operation is successfully completed, and has a non-null value if there is an error: In a sequential read ( Getseq  and  Rdseq ),  fstat  is set to '1' at the end of the file. On  Lock ,  fstat  is set to '1' if the lock could not be performed. For a database operation ( Read ,  Look ,  Readlock ,  For ,  Write ,  ...

3 ways to send a mail from code in Sage X3, with more attachments too

Origen Fuente:  https://en.sagedev.it/sagex3/send-mail-from-code-with-attachments-sage-x3/ Autor:  https://en.sagedev.it/category/sagex3/ In this post I’ll show you how to send a mail from adonix code in Sage X3. The points we will face are: 1) Meladx/Send introduction 2) Sending  through  meladx (the best way for me: at the end with just a single code line you send a mail!) 3) Sending  through  Workflow 4) Sending  through  ENVOI_MAIL(…) From AWRKMEL Sending mail from code in Sage X3: Send vs meladx Sage X3 has two native ways for sending mails. The first way is  meladx  executable file, that you can find in  runtime\bin  directory. The seconde one is Send instruction, that was used to send mail through an application of the client station (for more information on “Send GSERMES”  go here ). The Meladx executable Meladx send messages through SMTP/POP3 protocols by means of the mail  ...

How to Install and Manage Sage X3 Add-Ins in Microsoft Office

When you enable an add-in, it adds custom commands and new features to Microsoft Office programs that help increase your productivity. In this blog post, we’ll review how to install the Sage X3 Add-In for MS Excel and what to do if your Sage X3 Add-In is missing. Fuente original: https://www.netatwork.com/how-to-install-and-manage-sage-x3-add-ins-in-ms-office/ How to Install the Sage X3 Add-In in Microsoft Excel Go to Administration > Utilities > Installation > Install addins for Office V11 Image:   V12 Image:   It should begin downloading the exe, open the exe Next > Install   Open Excel > File > Options   Select Add–Ins > Manage: COM Add-ins > Go   Check the “Excel AddIn for Sage” > Ok   You are now ready to export Excel-based reports/grids from Sage X3. How to troubleshoot and fix a missing Sage X3 add-in in Microsoft Excel Open the Microsoft Office product where the  Sage X3  add-in is missing. Go to Options: Se...