Shortcuts v2.0. Modern Shortcuts for the Modern Age. [ Updated list of shortcuts for Sage X3 Version 12 ]
For today's blog we are going to take a quick look at the updated shortcuts for version 12. Every once in a Blue Moon the R&D department will update the shortcut combos, just as I am about to show. Introduced in version 12 patch 18 was an updated list of shortcut commands. If you want, you can find these listed in the online help (for those on patch 18+) or you can follow along or bookmark this post for later use or print out the end piece. I made the list in a nice neat grid for easy copy/pasting. Its at the end of the post if you don’t want to wait for it.
As with every change they make in Sage X3, I am not 100% sure what prompted the updates but here they are. I do know that some of them are the same, but some have changed so make sure to read it thoroughly.
Here is some examples of what I am talking about. First up is the Ring panel stuff, these are listed below.
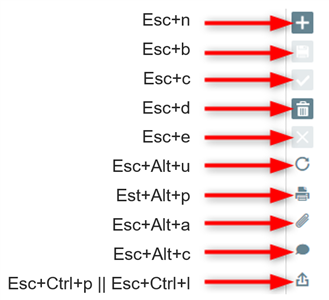
SideNote: I know that the ESC+CTRL+P looks hard, but if you stretch your fingers super wide you might be able to hit them with one hand. :P
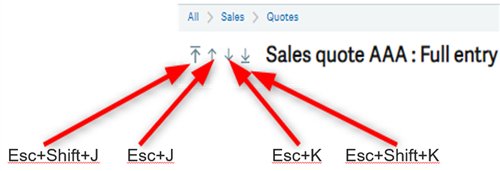
Next, I have the navigation for records. These refer to stuff like next record or previous record.
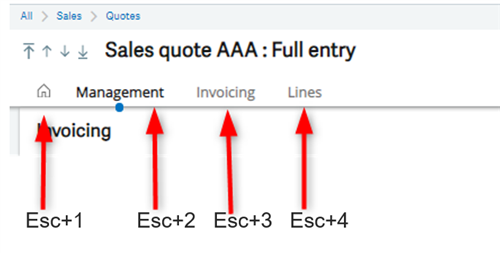
Right underneath that we have the tabs for the screens. So, each tab will be a number. This also is automatically picked up to increment numbers when you add custom tabs like EDI. If you added EDI tab after Lines (for example) it would be ESC+5. This can go up to 0. 0 comes after 9 which makes no sense until you look at your keyboard. Then it makes a lot of sense.
Then we have some quick navigation. I am not sure how often these would be use, but here they are.
the image shows up super tiny so make sure to click on it to see a blown up version of it.

We also have the online help (which I am pretty sure did not change).
I have no picture because its just ESC+F1. You get function help when you have no focus (no cursor on a field) and you get field help if you are focused on a field.
You all get the idea and I wanted to keep it kind of short. I have a more complete list below.
P.S.
For more shortcut information for prior versions see my friends blog post below.
This is that listing I was talking about:
SHORTCUT KEY COMBINATIONS
| |
RIGHT PANEL ACTIONS
| |
SHORTCUTS
|
FUNCTIONS
|
ESC+N
|
NEW
|
ESC+B
|
SAVE
|
ESC+C
|
CREATE
|
ESC+D
|
DELETE
|
ESC+E
|
CANCEL
|
ESC+ALT+U
|
REFRESH
|
ESC+ALT+P
|
PRINT
|
ESC+ALT+A
|
ATTACHMENT
|
ESC+ALT+C
|
COMMENT
|
ESC+CTRL+( P or L)
|
EXPORT
|
RECORD NAVIGATION ACTIONS
| |
SHORTCUTS
|
FUNCTIONS
|
ESC+SHIFT+J
|
FIRST RECORD
|
ESC+J
|
PREVIOUS RECORD
|
ESC+K
|
NEXT RECORD
|
ESC+SHIFT+K
|
LAST RECORD
|
PAGE NAVIGATION ACTIONS
| |
SHORTCUTS
|
FUNCTIONS
|
ESC+1
|
FIRST SCREEN TAB
|
ESC+2
|
SECOND SCREEN TAB
|
ESC+3
|
THIRD SCREEN TAB
|
ESC+4
|
FOURTH SCREEN TAB
|
ESC+UP ARROW
|
MOVES ONE SECTION UP
|
ESC+DOWN ARROW
|
MOVES ONE SECTION DOWN
|
PAGE UP
|
SCROLLS ONE FRAME UP
|
PAGE DOWN
|
SCROLLS ONE FRAME DOWN
|
UP ARROW
|
SCROLLS ONE LINE UP
|
DOWN ARROW
|
SCROLLS ONE LINE DOWN
|
PRIMARY ACTIONS
| |
SHORTCUTS
|
FUNCTIONS
|
ESC+G+N
|
HOME SCREEN
|
ESC+G+B
|
BOOKMARKS
|
ESC+G+H
|
NAVIGATION SCREEN
|
HELP ACTIONS
| |
SHORTCUTS
|
FUNCTIONS
|
ESC+F1
|
WHEN FOCUS IS ON A FIELD WILL CALL FIELD HELP
|
WHEN THERE IS NO FOCUS WILL CALL FUNCTION HELP
| |
TABLE ACTIONS
| |
SHORTCUTS
|
FUNCTIONS
|
ESC+INS
|
INSERTS A NEW LINE
|
ESC+DEL
|
DELETES A LINE
|
ESC+R
|
EXPAND / SHRINK ALL COLUMNS
|
LEFT LIST ACTIONS
| |
SHORTCUTS
|
FUNCTIONS
|
ESC+F5
|
REFRESH THE LEFT LISTING
|
ESC+F11
|
TOGGLE LEFT BAR
|
ESC+H+L
|
DOES THE SAME THING AS ESC+F11
|
ESC+SHIFT+LEFT ARROW
|
MOVE FROM THE ENTRY SCREEN TO THE LEFT LIST
|
FIELD ACTIONS
| |
SHORTCUTS
|
FUNCTIONS
|
ESC+F4
|
ALLOWS TO NAVIGATE WITHIN FIELDS WITH LOOKUPS
|
ESC+F9
|
ALLOWS TO TUNNEL ON FIELDS WITH THE ABILITY TO TUNNEL
|
ESC+F12
|
ALLOWS TO NAVIGATE FIELDS WITH DROPDOWN MENUS
|
ESC+L
|
DOES THE SAME AS ESC+F12
|
MISCELLANIOUS ACTIONS
| |
SHORTCUTS
|
FUNCTIONS
|
ESC+S
|
OPENS THE SEARCH FUNCTION
|
ESC+W+Z
|
RESET A USERS PREFERENCES
|
ESC+T
|
SET DATE TO TODAY'S DATE
|
ESC+F6
|
OPENS THE FIELD PROPERTIES
|
ESC+Q
|
GO TO THE FIRST FILTERED ROW
|
ESC+F7
|
DOES THE SAME AS ESC+S
|
- Obtener enlace
- X
- Correo electrónico
- Otras aplicaciones
- Obtener enlace
- X
- Correo electrónico
- Otras aplicaciones