Ir al contenido principal

How To Add a Custom Selector for the Screen Field

Fuente original del artículo: https://www.rklesolutions.com/blog/how-to-add-a-custom-selector-for-the-screen-field

There may be times when you want to add a pop-up window to select a field for a screen. Sometimes this can be handled automatically if the field is a standard X3 object field (i.e. when selecting a product with a type of ITM from the ITMMASTER table). There may be other times where a standard look-up is not available, and some custom code is required to do the selection window. We'll show you how to add a custom selector of your choosing to the screen field.

ADD SELECT ON SCREEN FIELD

The first step is to add the appropriate code to the field on the screen in Sage X3:

  1. Go to Development > Script Dictionary > Screens
  2. Select Your Screen
  3. Select the field to have the lookup for by moving your cursor to it on the screen. The field should show with a blue background.
    Custom Selector for Screen Field #1
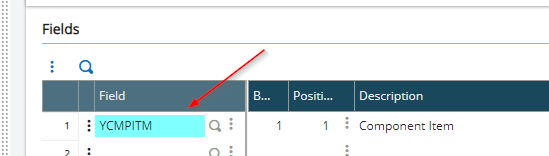
  4. Select a type of "Selection", and an action of GSELECT. (GSELECT is a standard action in X3 for general selection.)
    Custom Selector for Screen Field #2
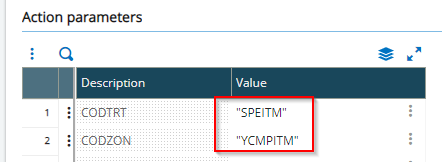
  5. Two parameters will appear in the "Action Parameters" section below the Actions. Populate the two fields as described below:
    1. CODTRT — this is the SPE code (i.e. 4GL) where the custom logic will be added to select the value from a table. In this case, I am customizing the ITMMASTER screen, which is part of the ITM object, so the SPE code is SPEITM.
    2. CODZON— this is the field name you will add the lookup to. This will be used in the SPE code to direct the lookup logic.
      Custom Selector for Screen Field #3

ADD THE 4GL CODE

Using the Eclipse editor, open the .src file. In this example, the source file is SPEITM.src. If there is already custom code, the file may already exist. Otherwise, the file will have to be created.

  1. Add the $ACTION section.
    Custom Selector for Screen Field #4
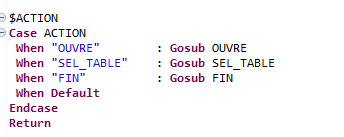
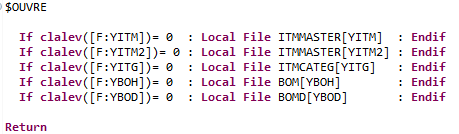
  2. Define the $OUVRE sub— this is used to open the tables that will be used in the lookup query.
    Custom Selector for Screen Field #5
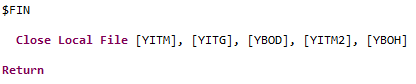
  3. Define the $FIN sub— this is used to closet the tables that were opened in the OUVRE sub.
    Custom Selector for Screen Field #6
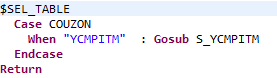
  4. Define the SEL_TABLE sub. This is the logic that will be called when the GSELECT action is initiated. Note the the "YCMPITM" matches the "CODZON" field entered on the screen. When GSELECT is called, it knows to call S_YCMPITM when the CODZON value is "YCMPITM". If multiple GSELECTS are defined for multiple fields, the CODZON will determine which select logic to use.
    Custom Selector for Screen Field #7
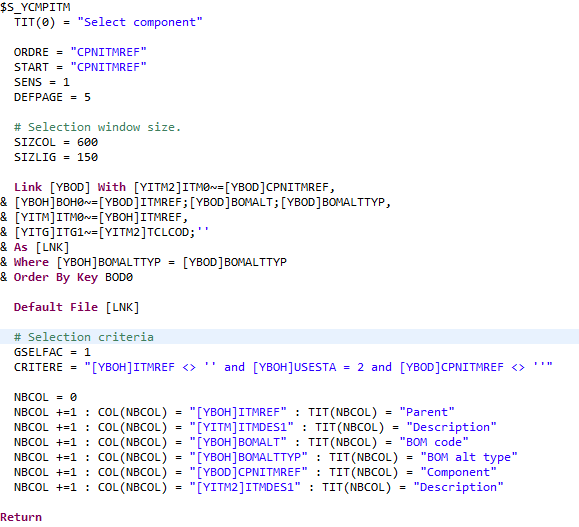
  5. Define the select logic. In this example, a Link statement is made to join multiple tables to include fields from the selection window. Additionally, the resulting values are filtered based on the CRITERE value defined on the screen.
    Custom Selector for Screen Field #8

VIEW THE RESULTS

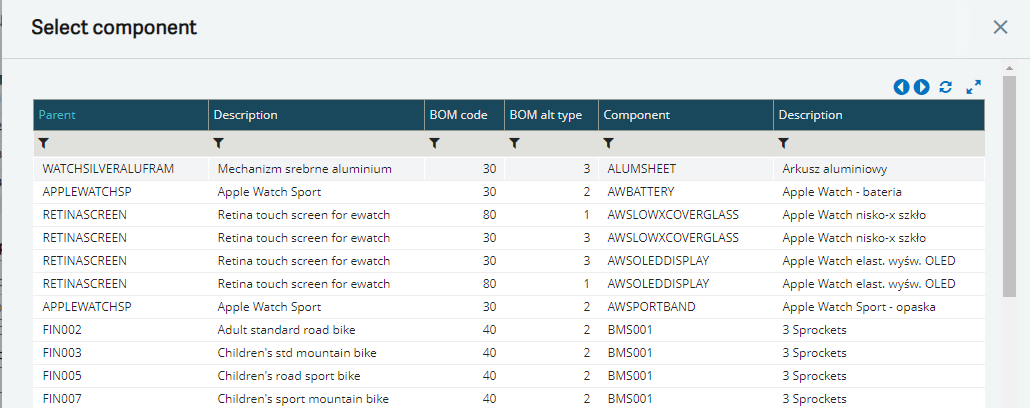
To review the results, go to the screen and select the search icon.

Custom Selector for Screen Field #9

The search window will appear as shown below. The filter values can be entered at the top to filter the results further.

Custom Selector for Screen Field #10

CONCLUSION

There may be times when you need to add a custom selector for a field on a screen or when a standard object or data type does not perform the lookup functionality automatically. With a little bit of coding, you can add logic to perform a custom selection window on your screen.


Entradas populares de este blog

Valores de fstat

Fstat fstat  is a numeric status that is returned upon execution of a database operation, a sequential file operation, or a lock instruction. Syntax fstat Examples # MYTABLE is a table with a key called KEY1, that has a unique component called KEYVAL # Create a record in the table MYTABLE with they key value 1 if it doesn't exist Local File MYTABLE [MYT] Read [MYT]KEY1=1 If fstat [MYT]KEYVAL=1 : Write [MYT] If fstat MSG="The key was created in the mean time" Else MSG="Key created" Endif Else MSG="Key already exists" Endif Details fstat  is always set to '0' if the operation is successfully completed, and has a non-null value if there is an error: In a sequential read ( Getseq  and  Rdseq ),  fstat  is set to '1' at the end of the file. On  Lock ,  fstat  is set to '1' if the lock could not be performed. For a database operation ( Read ,  Look ,  Readlock ,  For ,  Write ,  ...

SAGE X3 SILENT IMPORT (IMPORTSIL) WITH ERROR CATCHING

FUENTE ORIGINAL: https://pluginx3.com/en/blog/post/sage-x3-silent-import-importsil-with-error-catching.html You already know how to manually generate a CSV file in order to import it threw a template in Sage X3. But If you wonder how to catch detailed errors after a silent import here is the solution. Sometimes you need to catch the incoming errors in order to alert the end-user regarding an issue. Closed period, wrong date etc …. Unfortunalty the standard Sage X3 silent import function doesn’t natively show the detailed errors during the import process. Call IMPORTSIL([M:IMP2]MODIMP,[M:IMP2]NOMIMP) From GIMPOBJ And the standard function ERR_IMPORT will only show the overall status of the importation and not the detailed errors. IMPORTSIL function is pushing all the log data into a tracefile in order to avoid any popup on end-user screen. So you have a log file available in order to search for errors in it. Sage X3 runtime is using the same principals standards as any shell for log...

3 ways to send a mail from code in Sage X3, with more attachments too

Origen Fuente:  https://en.sagedev.it/sagex3/send-mail-from-code-with-attachments-sage-x3/ Autor:  https://en.sagedev.it/category/sagex3/ In this post I’ll show you how to send a mail from adonix code in Sage X3. The points we will face are: 1) Meladx/Send introduction 2) Sending  through  meladx (the best way for me: at the end with just a single code line you send a mail!) 3) Sending  through  Workflow 4) Sending  through  ENVOI_MAIL(…) From AWRKMEL Sending mail from code in Sage X3: Send vs meladx Sage X3 has two native ways for sending mails. The first way is  meladx  executable file, that you can find in  runtime\bin  directory. The seconde one is Send instruction, that was used to send mail through an application of the client station (for more information on “Send GSERMES”  go here ). The Meladx executable Meladx send messages through SMTP/POP3 protocols by means of the mail  ...