Ir al contenido principal

How to Configure a Field to be Mandatory


This topic is not that flashy but has been very useful, easy to configure and highly requested. It is basically configuring a field to be mandatory in a Sage ERP X3 function. I have 2 examples just to show different scenarios that this might be used.

SCENARIO 1: Shipping Site needs to be entered on ship-to Customer tab on the customer record when they are created
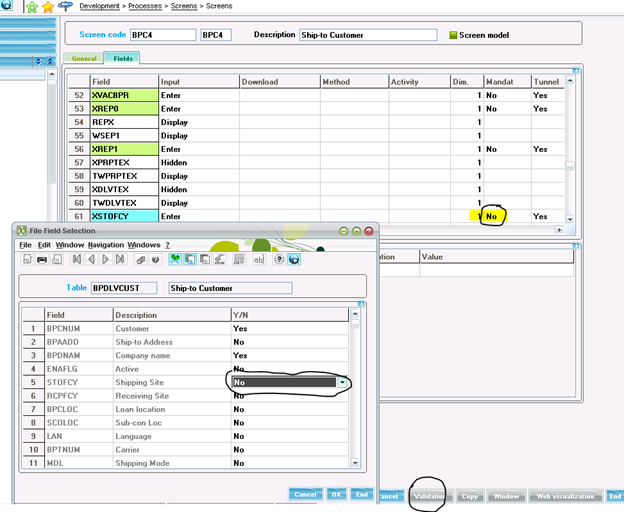
This is to make sure that when a Customer record is created that a default Shipping Site is added to the Ship-To Customer so it is set when creating an Order for the Customer. You configure this in the Development -> Processes -> Screens -> Screens function of Sage ERP X3.
Select the BPC4 screen and click on the Fields tab. You want to change the Mandat column to Yes for the Field, Shipping Site. This will make it Mandatory. You right-click in the Mandat column for the Shipping Site row on the BPC4 Screen, a new form will pop-up. You select the field and change the value to Yes. Click Ok to return. Save your changes. Then you need to perform Validation on the screen to publish the change.

SCENARIO 2: Making sure that Products get created with Normal Tax
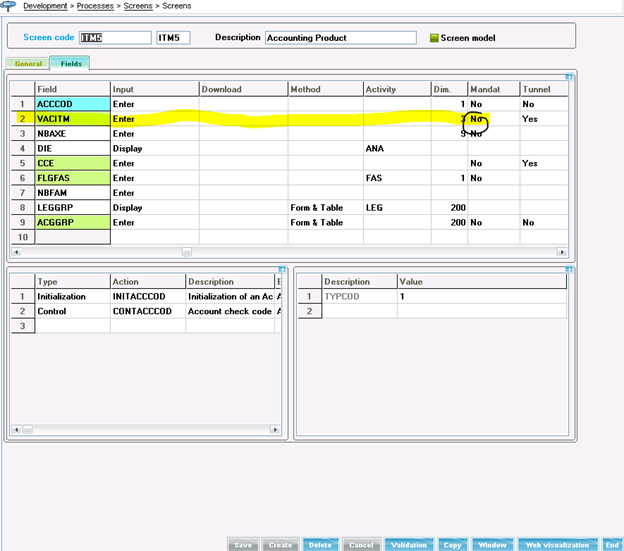
This is to make certain that when you create a new Product that you have to apply it a Tax class. You want to make sure this is assigned that way when you add this item to a Sales Order it has a Default Tax class. You configure this in the Development -> Processes -> Screens -> Screens function of Sage ERP X3.
Select the ITM5 screen and click on the Fields tab. You want to change the Mandat column to Yes for the Tax Level. This will make it Mandatory. You right-click in the Mandat column for the Tax Level row on the ITM5 Screen, a new form will pop-up. You select the field and change the value to Yes. Click Ok to return. Save your changes. Then you need to perform Validation on the screen to publish the change.

Again this was nothing earth but I know it is not the most intuitive thing to uncover until you know what you are looking for. I give you a word of caution, make sure that you keep track of what you are doing in case you need to undo anything or redo anything at a future time. Please change things with caution, you could find yourself making changes that you did not expect and could cause frustration trying to track it down.
As for how can you make changes to the system, comment those changes and track them down later, we will cover that in the next blog. Stay tuned…

Entradas populares de este blog

Valores de fstat

Fstat fstat  is a numeric status that is returned upon execution of a database operation, a sequential file operation, or a lock instruction. Syntax fstat Examples # MYTABLE is a table with a key called KEY1, that has a unique component called KEYVAL # Create a record in the table MYTABLE with they key value 1 if it doesn't exist Local File MYTABLE [MYT] Read [MYT]KEY1=1 If fstat [MYT]KEYVAL=1 : Write [MYT] If fstat MSG="The key was created in the mean time" Else MSG="Key created" Endif Else MSG="Key already exists" Endif Details fstat  is always set to '0' if the operation is successfully completed, and has a non-null value if there is an error: In a sequential read ( Getseq  and  Rdseq ),  fstat  is set to '1' at the end of the file. On  Lock ,  fstat  is set to '1' if the lock could not be performed. For a database operation ( Read ,  Look ,  Readlock ,  For ,  Write ,  ...

SAGE X3 SILENT IMPORT (IMPORTSIL) WITH ERROR CATCHING

FUENTE ORIGINAL: https://pluginx3.com/en/blog/post/sage-x3-silent-import-importsil-with-error-catching.html You already know how to manually generate a CSV file in order to import it threw a template in Sage X3. But If you wonder how to catch detailed errors after a silent import here is the solution. Sometimes you need to catch the incoming errors in order to alert the end-user regarding an issue. Closed period, wrong date etc …. Unfortunalty the standard Sage X3 silent import function doesn’t natively show the detailed errors during the import process. Call IMPORTSIL([M:IMP2]MODIMP,[M:IMP2]NOMIMP) From GIMPOBJ And the standard function ERR_IMPORT will only show the overall status of the importation and not the detailed errors. IMPORTSIL function is pushing all the log data into a tracefile in order to avoid any popup on end-user screen. So you have a log file available in order to search for errors in it. Sage X3 runtime is using the same principals standards as any shell for log...

3 ways to send a mail from code in Sage X3, with more attachments too

Origen Fuente:  https://en.sagedev.it/sagex3/send-mail-from-code-with-attachments-sage-x3/ Autor:  https://en.sagedev.it/category/sagex3/ In this post I’ll show you how to send a mail from adonix code in Sage X3. The points we will face are: 1) Meladx/Send introduction 2) Sending  through  meladx (the best way for me: at the end with just a single code line you send a mail!) 3) Sending  through  Workflow 4) Sending  through  ENVOI_MAIL(…) From AWRKMEL Sending mail from code in Sage X3: Send vs meladx Sage X3 has two native ways for sending mails. The first way is  meladx  executable file, that you can find in  runtime\bin  directory. The seconde one is Send instruction, that was used to send mail through an application of the client station (for more information on “Send GSERMES”  go here ). The Meladx executable Meladx send messages through SMTP/POP3 protocols by means of the mail  ...